NOTE: This page is a continuing work in progress. Check back regularly for more information.
|
Brush Up on Your Photoshop SkillsBrushes are a great tool that helps you create a quick design with very little effort. There are many sources of brushes available on the Internet. Some are for sale; some are free. Just be sure that if you are downloading the free brushes that it is a reputable site. Of course, this is true for those you pay for, too. Whenever you are downloading files from the Web to your computer, you could be bringing some devastating viruses, too.
I have included a list of resources that I have used for several years. So far, so good. |
Installing brushes in Photoshop
Depending on the version of Photoshop you are using, installing your downloaded brushes is really simple. I use Photoshop CS6.
- Download the brush file.

2. Open the file window. Most downloaded files will includse several files such as readme text files, installation instructions, a jpg image of the brushes, and the brush itself. You will notice it is an ABR file.

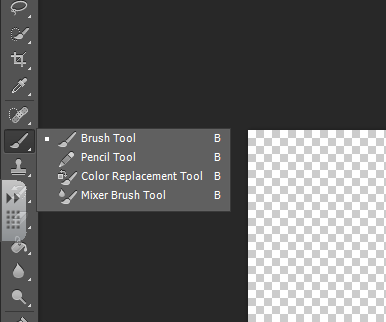
3. Double-click the ABR brush file. Your computer will automatically install it into Photoshop. When you are ready to use a brush in Photoshop, choose the brush tool. When you click in the brush selection window in the properties box at the top of the screen, you will find your brush added to the end of the brushes.
4. Now you are ready to use your brush. Select the color(s) you want to use. Set the size of the brush. Then click for a single image or drag your mouse for the spread effect.
Using Photoshop Brushes
Photoshop offers general brushes and decorative brushes for your use. When you open Photoshop, open the brushes picker to see what is available for you. You have already learned how to add additional brushes that you find on the Internet or purchase from dealers. Take the time to play with the brushes to see what effects you get from each brush. You will also notice that you can control the hardness or softness of the brushes. This means that you can control how sharp or feathery you want the edges to be.

Now let's take that brush and make a dotted path.
- Chose the size brush you want and the color you want.
- Go to the Window menu and choose Brush.
- At the bottom of the Brush panel that opens up there is a Spacing slider. Drag the slider over until you have the spacing you want. You can see this in the Preview pane at the bottom.

4. Now draw your line however you want.
5. Now let's do the same thing to draw a dashed line.
5. Now let's do the same thing to draw a dashed line.

6. Choose a square brush. Resize it how you want. Set the spacing that you want.
7. We need to squash it down to make it more of a line. Click on the circle above the Spacing slider. You may have to select Brush Tip Shape at the top of the left panel.
8. Pull the handle at the top of the circle down until you have flattened it as much as needed.
7. We need to squash it down to make it more of a line. Click on the circle above the Spacing slider. You may have to select Brush Tip Shape at the top of the left panel.
8. Pull the handle at the top of the circle down until you have flattened it as much as needed.

9. That works. Oops! There is a problem with the line. We need it to follow the direction of the cursor.
10. No problem. Go back to the Brush panel. Click on Shape Dynamics. Under Angle Jitter, click the pull down arrow and choose Direction.
11. Now as you draw your line, it will follow your curose.
10. No problem. Go back to the Brush panel. Click on Shape Dynamics. Under Angle Jitter, click the pull down arrow and choose Direction.
11. Now as you draw your line, it will follow your curose.

3. Draw your shape on your canvas.
4.
4.
Using Decorative Brushes
Now that you have the brushes downloaded and installed on your computer, it's time to see the magical power that these brushes have in your designing.
1. Set up your document to prepare for your brushes. Select your brush tool.
1. Set up your document to prepare for your brushes. Select your brush tool.
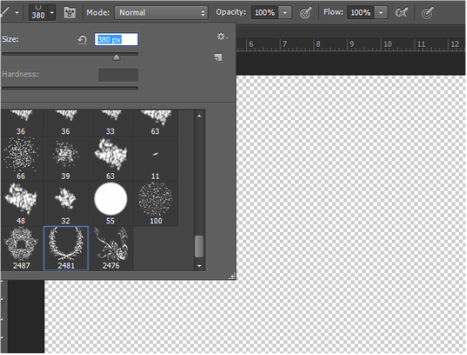
2. Move to the brush selection pull-down arrow to select the brush that you want to use. You can resize the brush by using the slider at the top of the window at this time, or you can use the [ ] (bracket) keys to change the size of your brushes. HINT: The brush selector window must be closed for the bracket keys to work. Just click anywhere on the screen, not the canvas, to make it disappear.

3. Set up your brush to fit your design. Change the size as I just mentioned. Click on the color picker to change the color of your brush. In the property bar at the top of the screen, you can change the opacity and flow to control the transparency and hardness/softness of the brush.
HINT, HINT (In other words HUGE HINT): Set your brush strokes on their own layers. If you click your brush several times on a single layer, you will not have
HINT, HINT (In other words HUGE HINT): Set your brush strokes on their own layers. If you click your brush several times on a single layer, you will not have

